

How to create a TinyMCE custom dialog plugin
This example shows you how to implement a dialog box or popup window in TinyMCE v4.
Published 25th of August 2018
Episerver 11
Episerver.Cms.TinyMce > 2.0
TinyMce > 4.0
In this blog post I’ll give you one example how to implement custom button plugin in tinyMCE. The example scenario is a custom button with dialog options to add Image description, size and positioning the image/wrapping div. The button should be only applicable on image.
So… 2 steps
- Code a tinymce.PluginManager class
- Register the script and plugin
Adding your plugin to TinyMCE in Episerver CMS
using EPiServer.Cms.TinyMce.Core;
using EPiServer.Framework;
using EPiServer.Framework.Initialization;
using EPiServer.ServiceLocation;

namespace Gosso.Mvc.Business.Initialization
{
    [ModuleDependency(typeof(TinyMceInitialization))]
    public class CustomizedTinyMceInitialization : IConfigurableModule
    {
        public void Initialize(InitializationEngine context)
        {
        }

        public void Uninitialize(InitializationEngine context)
        {
        }

        public void ConfigureContainer(ServiceConfigurationContext context)
        {
            context.Services.Configure<TinyMceConfiguration>(config =>
            {
                config.Default()
                    .AddPlugin("code") // i do want see code
                    .AddExternalPlugin("customimagebuttonplugin",
                        "/ClientResources/Scripts/tinymce/plugins/customimagebuttonplugin/editor_plugin_v4.js")
                    .Toolbar(DefaultValues.Toolbar + " | code customimagebuttonplugin");
            });

        }
    }
}
Adding your plugin to in a non Episerver website
Add scripts to site:
<script src=”/tinymce/js/tinymce.min.js”></script>
<script src=”/ClientResources/Scripts/tinymce/plugins/customimagebuttonplugin/editor_plugin_v4.js “></script>
Then init tiny:
tinymce.init({  selector: 'textarea',
  plugins: 'customimagebuttonplugin',
  toolbar: 'customimagebuttonplugin'
});
tinymce.PluginManager.add
The main parts in a plugin is explained with this image:
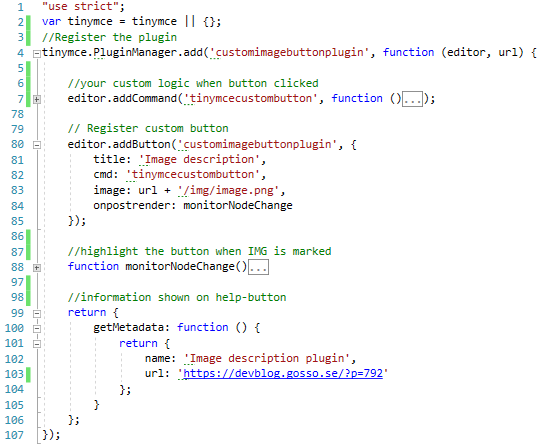
- Use tinymce.PluginManager.add to register
- addCommand is used for you custom logic
- addButton to add your button to toolbar
- monitorNodeChange is non mandatory, where you can put logic for enabling/disabling your button
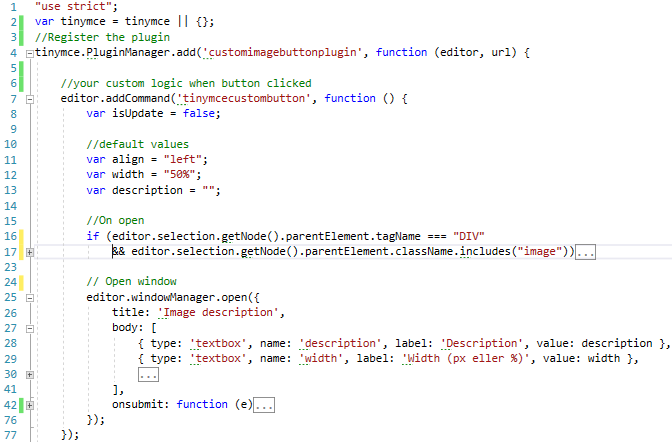
editor.addCommand && editor.windowManager.open
addCommand is triggered from your button registration when button clicked, check cmd: “tinymcecustombutton” in example above
TinyMCE supply a very useful lib, so by using editor.windowManager.open, you may build a nice dialog form.
editor.windowManager.open takes several fields, in this example: Title, Body, OnSubmit, where you in “Body” specify UI fields you want to use. Use onsubmit for your logic processing input values, then editor.selection.setContent to input in tinymce.
CSS
You need this CSS to add on site and tinyMCE for this plugin to work:
.imageleft {
    float: left;
    margin-right: 10px;
}

.imageright {
    float: right;
    margin-left: 10px;
}

.imagecenter {
    margin-left: auto;
    margin-right: auto;
}
The complete js code:
https://gist.github.com/LucGosso/b5c723b832435b8ae396487ef5befdc3#file-editor_plugin_img-js
"use strict";
var tinymce = tinymce || {};
//Register the plugin
tinymce.PluginManager.add('customimagebuttonplugin', function (editor, url) {
//your custom logic when button clicked
editor.addCommand('tinymcecustombutton', function () {
var isUpdate = false;
//default values
var align = "left";
var width = "50%";
var description = "";
//On open
if (editor.selection.getNode().parentElement.tagName === "DIV"
&& editor.selection.getNode().parentElement.className.includes("image")) {
width = editor.selection.getNode().parentElement.style.maxWidth;
description = editor.selection.getNode().parentElement.textContent;
align = editor.selection.getNode().parentElement.className.replace("image", "");
isUpdate = true;
}
// Open window
editor.windowManager.open({
title: 'Image description',
body: [
{ type: 'textbox', name: 'description', label: 'Description', value: description },
{ type: 'textbox', name: 'width', label: 'Width (px eller %)', value: width },
{
type: 'listbox',
name: 'align',
label: 'Align',
values: [
{ text: 'Left', value: 'left' }, //tinymce.DOM.decode("Vänster") <-- for swedish
{ text: 'Right', value: 'right' },
{ text: 'Center', value: 'center' }
],
value: align // Sets the default
}
],
onsubmit: function (e) {
var alignmentclass = 'image' + e.data.align;
var selectedimg = editor.selection.getNode();
var width = e.data.width;
if (width !== undefined && !width.includes("px") && !width.includes("%")) {
if (width > 100)
width += "px";
else if (width === "")
width = "50%";
else
width += "%";
}
if (isUpdate) {
selectedimg.parentElement.dataset.mceStyle = "max-width: " + width;
window.tinyMCE.DOM.setStyle(selectedimg.parentElement, "max-width", width);
selectedimg.parentElement.className = alignmentclass;
selectedimg.parentElement.childNodes[1].innerText = e.data.description;
} else { //first time use
if (selectedimg.src) {
var arr = selectedimg.src.split("/");
var src = "/" + arr.splice(3, arr.length).join("/");
editor.selection.setContent('<div style=max-width:' +
width +
' class=' +
alignmentclass +
'><img src=' +
src +
' class="img-responsive" alt="" /><p>' +
e.data.description +
'</p></div>');
}
}
}
});
});
// Register custom button
editor.addButton('customimagebuttonplugin', {
title: 'Image description',
cmd: 'tinymcecustombutton',
image: url + '/img/image.png',
onpostrender: monitorNodeChange
});
//highlight the button when IMG is selected
function monitorNodeChange() {
var btn = this;
editor.on('NodeChange',
function (e) {
btn.disabled(!e.element ||
!e.element.nodeName ||
e.element.nodeName.toLowerCase() !== "img");
});
}
//information shown on help-button
return {
getMetadata: function () {
return {
name: 'Image description plugin',
url: 'https://devblog.gosso.se/?p=792'
};
}
};
});
SEO Terms
- Add Plugins to TinyMCE
- Build your own plugin for episerver wysiwyg
- Could not load type ‘EPiServer.Editor.TinyMCE.TinyMCEPluginNonVisualAttribute’ from assembly ‘EPiServer.Cms.TinyMce. Having this error? Remove TinyMCEPluginButton registration in your cs code. Replace with TinyMceInitialization
Resources
- https://world.episerver.com/documentation/developer-guides/CMS/add-ons/customizing-the-tinymce-editor-v2/
- https://world.episerver.com/blogs/Ben-McKernan/Dates/2018/3/an-updated-tinymce-package-has-been-released/
- https://www.tinymce.com/docs/advanced/creating-custom-dialogs/
- https://www.tiny.cloud/docs/api/tinymce/tinymce.windowmanager/#open
- https://www.tiny.cloud/docs/advanced/creating-a-plugin/
About the author
 Luc Gosso
– Independent Senior Web Developer
working with Azure and Episerver
Twitter: @LucGosso
LinkedIn: linkedin.com/in/luc-gosso/
Github: github.com/lucgosso